Revit View Range is a dilemma for some users and a fairly confusing subject, and it seems that many individuals from the AEC community just use tests and errors to adjust the view range settings until they find the perfect view they want.
In fact, this is the method I used to use frankly until I was demanded to explain the view range settings to a member of my BIM team.
I struggled through demonstrating what I thought it was and ended with the fact that I usually just modified the settings until I could see what I wanted to see. It is that this works, but this is not the perfect method to use.
When I admitted I didn’t know how to reply to the question suitably and that the only recommendation I could give to someone was to use tests until you find the perfect settings. I decided that I ought to do some research on google and LinkedIn and figure it out how it should be done. That’s what poked me to choose this subject for this article on our bimandbeam.com Blog.
I comprehend how incoherent this topic can be, because it twisted me for a long period as well, and I liked to deliver a proper and detailed explanation for those questioning, “What are the settings of the View range in Revit ?” and “How does the View Range work?”
Revit View Range: What is it First?
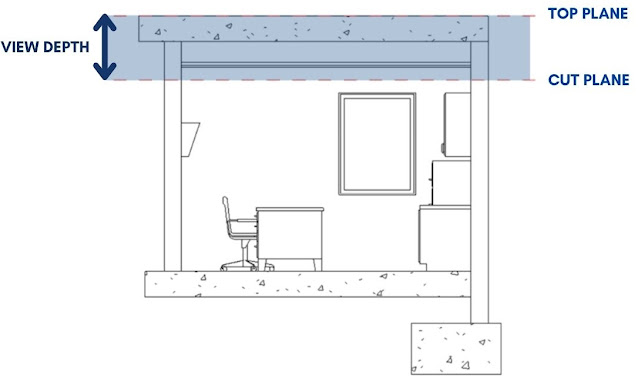
Revit View Range is occasionally referred to as the Visible Range in our view when using Revit. It requires some settings to adjust according to your needs. And as Autodesk defined it as “ a set of horizontal planes that control the visibility and display of objects in a plan view”. Every plan or ceiling view must have a view range setting. The Revit View Range ( VR ) is made up of a primary range and a view depth. The first one is represented by three horizontal planes: the top, the bottom, and a cut plane.
The top plane defines the top of the VR and the bottom likewise represents the bottom of it. And between them, we have the cut plane. And it is the dividing line that specifies how elements are displayed and represented in the view. The extra plane beyond the primary range is called the View Depth. By adjusting it and adding the offset value, if there is no offset simply put ”0”, you can handle the visibility of all the elements that are below the bottom plane of the primary range.

Element Visibility
I think that all is clear about the Revit View Range and its plane, so let’s talk now about how it affects the visibility of elements in the view. Commonly, elements that are placed outside the view range don’t display. Also, if you want to make certain elements that are outside the View Range visible in your view, you can do this by setting an underlay to display a level outside the View Range. Each element that is within view range is displayed using the cut line weight or projection line weight. Or the Beyond line style.
The element used to show objects is defined by the altitude of the cut plane. Elements under the cut plane will be shown using the projection line weight, and elements that intersect with the cut plane will be shown with the cut line weight. Elements above the cut plane are not shown only for windows and casework or general models. And these elements are shown with the projection line weight if they are placed above the cut plane as we said.
Commonly, elements that intersect with the cut plane will be shown with the projection line weight instead of the cut line weight for 2 reasons:
1- Walls that are shorter than 2 meters are not cut, even if they intersect with the cut plane. let’s take an example, if the top of the wall is 2m above our bottom plane, the wall will be “cut” at the cut plane, but if the of the wall’s top is less than 2m, then the whole wall will be shown with projection lines. This happens every time we set the Top Constraint as ‘Unconnected’. But if we set the Top Constraint, then the height of the cut plane will be utilized to determine the style of display of the wall (the cut line weight or the projected line weight)
2- The second reason that “cut” elements might be shown using the projection line weight is that certain families are simply non-cuttable. For these families, it is just the rule that they are shown with the projection line weight even if they intersect with the cut plane.
Revit View Range : categories that have non-cuttable families
And here below we listed these categories that have non-cuttable families
Air Terminals, Cable Tray Fittings, Cable Trays, Casework, Communication Devices, Conduit Fittings, Conduit, Data Devices, Detail Items, Duct Accessories, Duct Fittings, Duct Placeholders, Ducts, Electrical Equipment, Electrical Fixtures, Entourage, Fire Alarm Devices, Flex Ducts, Flex Pipes, Furniture, Furniture Systems, HVAC Zones, Lighting Devices, Lighting Fixtures, Mechanical Equipment, MEP Fabrication Containment, MEP Fabrication Ductwork, MEP Fabrication Hangars, MEP Fabrication Pipework, Nurse Call Devices, Parking, Pipe Accessories, Pipe Fittings, Pipe Insulations, Pipes, Planting, Plumbing Fixtures, Security Devices, Shaft Openings, Specialty Equipment, Sprinklers, Structural Beam Systems, Structural Rebar Couplers, Structural Trusses, Telephone Devices, and Wires
You can also show elements that are under the bottom plane by modifying the View Depth. This helps show elements like foundations and underground piping. Elements that are under the bottom plane or within the View Depth are generally displayed with the Beyond line style. But for floors, structural floors, stairs, or ramps, they have an adjusted range that is 1.2m under the bottom plane, and they are shown using the projection line weight within this modified range. If they are under the adjusted range while still within the View Depth, they are shown using the Beyond line style.
Revit View Range Examples
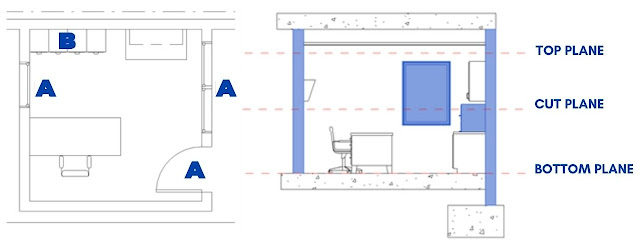
Elements That intersect the Cut Plane
In the section down below, elements that intersect the cut plane are shown in blue.
The floor plan below displays the following:

A. Elements that are shown using the cut line weight. These are the walls, doors, and windows.
B. Non-cuttable elements are shown using the projection line weight. These are furniture.
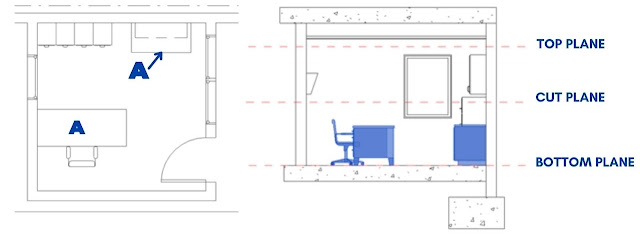
Elements Below the Cut Plane and Above the Bottom Plane
In the section below, elements that are below the cut plane and above the bottom plane are highlighted in blue.
The floor plan below illustrates the following:

A. Elements that are shown utilize the projection line weight because they do not intersect the cut plane. These are the chair, desk, and cabinet.
Elements Above the Cut Plane and Below the Top Plane
In the section below, elements that are above the cut plane and below the top plane are shown in blue.
The floor plan below illustrates the following:

A. Element that is shown using the projected line weight. This is the wall-mounted casework, and in this case, the dashed line style is expressed as the projected line weight for the family.
B. Elements that are not shown because they are not windows, casework, or generic models. These are the wall sconces.
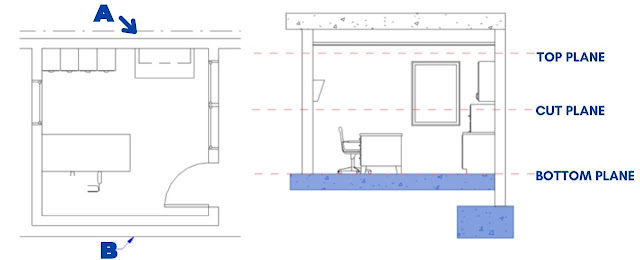
Revit View Range for Elements Below the Bottom Plane and Within the View Depth
In the section below, elements that are under the bottom plane and within the view depth are shown in blue.
The floor plan below shows the following:

A. Element that is shown using the Beyond line style. This is the foundation.
B. Element that is shown using the projection line weight. This is the floor and it is within the 1.2m adjusted range for that category.
Reflected Ceiling Plans

The View Range affects the visibility in a Reflected Ceiling Plan (RCP) in a similar, but slightly different way. Remember, an RCP’s view direction is looking up towards the ceiling from the level below. Thus, the View Range concerns the visibility of objects in the same way. Elements above, rather than below, the cut plane will be shown using the projection line weight and, since there isn’t a bottom plane in an RCP, the View Depth is determined upward from the cut plane.
Tutorial Video From Revit Pure Youtube Channel
Conclusion
It’s true that I took a long time to understand how Revit View Range works but I ‘am happy now with managing this nightmare of adjusting its settings, I hope that this article will help you to master this task too, and feel free to contact us and leave us your feedback and reviews.


I’m not sure where you’re getting your info, but great topic. I needs to spend some time learning more or understanding more.
Thanks for wonderful info I was looking for this information for my mission.
Thank you for your feedback , I’m really doing my best to post the best articles on several topics about BIM , I hope that you find all our articles useful , thank you again