Introduction
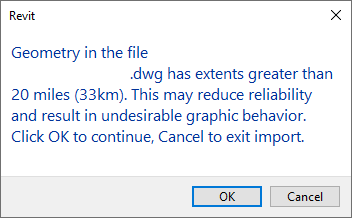
If you’ve tried to import a CAD file into Revit and encountered the error, “Geometry in the file .dwg has extents greater than 20 miles (33 km),” you’re not alone. This error can be frustrating, as it often prevents a seamless import and may lead to graphical or performance issues. In this guide, I’ll walk you through the steps to troubleshoot and resolve this issue quickly, so you can continue your work without interruption.

Why Does This Error Occur?
This issue arises when one or more elements in the CAD file are positioned far beyond a 20-mile (33-km) radius from the origin point. These distant elements can cause Revit to behave unpredictably, leading to visibility problems and difficulty navigating the imported file.
Common causes include:
- Extraneous objects or lines far from the drawing’s main content.
- Incorrect scaling between the CAD and Revit files.
Step-by-Step Solution to Resolve the Error
Step 1: Open and Clean Up the CAD File
- Open the CAD File in AutoCAD (or any CAD software): Open the file you wish to link in AutoCAD to locate any elements causing the error.
- Identify Elements Far from the Origin:
- Use the Zoom Extents command in AutoCAD (
ZEin the command line). This will help you spot any content located far from the main drawing. - Carefully check the outer edges of your drawing to see if any lines, objects, or insertion points are isolated from the main model.
- Use the Zoom Extents command in AutoCAD (
- Copy Only Essential Elements: Select the content you need for your Revit project, avoiding unnecessary elements, and copy it (
CTRL+C). - Paste into a New Drawing Close to the Origin:
- Open a new AutoCAD file.
- Set the insertion point close to the coordinates (0,0,0) for better control over element positioning in Revit.
- Paste the copied elements (
CTRL+V) into this new drawing and save the file.
- Remove Unwanted Elements with WBLOCK (Optional): Use the WBLOCK command to create a new drawing from the selected elements, ensuring that only necessary content is saved. This can minimize file size and simplify the import process.
Step 2: Ensure Consistent Units
- Check the Units in AutoCAD: In AutoCAD, check the units by typing
UNITSin the command line. Note the units used for measurement. - Match Units in Revit:
- Open your Revit project.
- Go to Manage > Project Units and verify that the units in Revit match those in your CAD file.
- If there’s a difference, either change the units in AutoCAD or adjust them in Revit when importing.
- Scale the CAD File if Needed: If the CAD file’s scale is incorrect, adjust it in AutoCAD to ensure the dimensions align with your Revit model’s requirements.
Step 3: Link the CAD File in Revit
- Insert the CAD Link in Revit:
- In Revit, go to Insert > Link CAD.
- Navigate to your cleaned-up CAD file, select it, and review the import options.
- Set the Import Units Correctly: In the Link CAD dialog, choose the correct units for the import. Selecting the wrong units can lead to scaling issues, so be sure they match the settings in your CAD file.
- Position the CAD Model: Choose an appropriate positioning method:
- Auto – Center to Center: Positions the CAD file centered in Revit’s workspace.
- Manual: Allows you to manually place the CAD file where you need it within the Revit environment.
- Finalize the Link: Click Open to link the CAD file. If prompted with any further options, confirm and proceed.
Step 4: Verify the CAD Import in Revit
- Zoom to Fit: After linking, use Zoom to Fit in Revit to confirm that the imported CAD file appears within the workspace as expected.
- Check for Graphical Issues: If everything looks as expected, begin working with the CAD data. If you notice any graphic inconsistencies, recheck the CAD file for rogue elements and follow the cleanup steps again.
Tips for Avoiding This Error in the Future
- Keep CAD Files Clean: Always remove extraneous elements from CAD files before linking them into Revit. This includes purging unused layers and blocks and positioning the elements close to the origin.
- Use WBLOCK Regularly: Recreating CAD files with the WBLOCK command can help prevent data far from the origin from being included in your Revit import.
- Consistently Check Units: Make it a habit to verify and adjust units in both CAD and Revit. This will ensure accurate scaling and reduce the chances of positioning issues.
- Minimize File Size: Keeping your CAD files lightweight will help Revit run more smoothly and make the linking process easier.
Conclusion
With these steps, you should be able to resolve the “Geometry in the file .dwg has extents greater than 20 miles” error in Revit efficiently. A clean and correctly scaled CAD file not only improves Revit’s performance but also saves time, allowing you to focus on creating quality BIM models. By following these best practices, you’ll prevent future issues and streamline your CAD-to-Revit workflow.
Happy modeling!


